Friday, 12 July 2013

Summer Outdoor Fun... Continued!

Okay, so I never said there would be a continuation of my previous blog post but it has been so amazing out at the front of our wee cottage since we knocked down the old vestibule/porch. We kept putting it off for so long thinking about what to replace it with when BAM... It hit us! (Well, hubby really though he claims it was my idea.) WHY REPLACE IT AT ALL?

Mind = blown. 

Moving on! We have basically now got a vintage-styled cottage garden at the front and are still reaping the benefits of having spent so much time on the back garden... Literally the best of both worlds! :) happy! 

Soooo, it hit me earlier that the back is the result of hard work and money, with a few exceptions on both counts. The front, however, is recycled, upcycled, thrifted, handmade JOY! And it's the most peaceful place ever to sit, too.


This blogpost will focus more in the individual decorative elements we made rather than the whole effect. We're still working on that! :) 

Here are some bottles I had collected. I love the Buddha ones as they were green (brand: lucky beer) but I really wanted them matt or shiny so the detail stood out. Cue a trip to halfords and the purchase of purple and oyster champagne spray paint. (We already had the silver.)


Next up was an old footstool I had in the spare room and we hadn't used for a while. It's got the perfect cushion cover to stencil or paint onto as it's a really thick and usefully neutral material. I used bright red fabric paint (just had a tiny jar, didn't need much!) and pritt-sticked the matryoshka stencils I bought in hobbycraft. The pritt stick is ok on fabric but you'll need to go slow and dab the paint while holding it a bit taut, rather than crazy brushing. 


Excuse the finger on the middle photo! :) 

Also, but massively not lastly, hubby made a table in a morning. Seriously, literally from 9.30 am until it was finished at 1! He had spare wood in the garage (insert own double entendre here...) and set about it. Needless to say his new table saw played a part in the construction. Happy hubby! :)


Tuesday, 9 July 2013

Summer Outdoor Fun!

Happy hot days, people! It's finally bursting out summer all over the place here in Scotland. Yay and also phew! Myself and my mr have been very busy in the garden clearing stuff away. He even found time to knock down our old, crumbling porch and it has just opened up the front so much. We almost need sunglasses to look at the white cottage walls! As usual, he does the practical stuff and I make it prettier! Ha Ha!

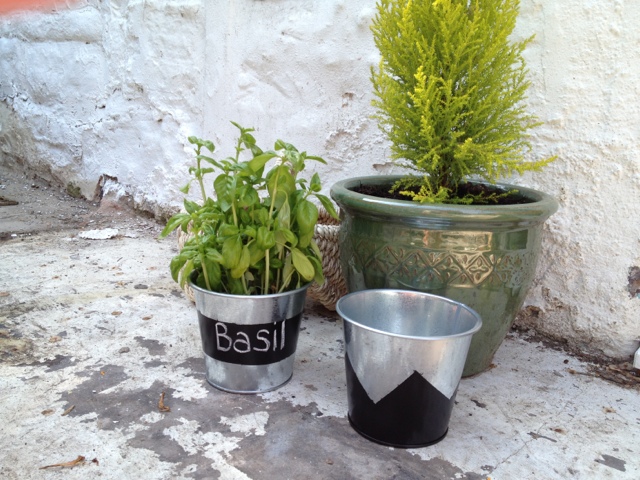
I've been painting old dining chairs and have nearly finished. I also use some - guess what? - chalkboard paint on some metal garden pots. Fun! 


And my summer feeeet! 


Tuesday, 2 July 2013

Hearty Birthday!

It was my lovely friend's birthday recently so I made her a wee trinket with love. I had a blank wooden heart shape and covered it with two coats of chalkboard paint. I got my paint in Hobbycraft but am sure other retailers will stock it too. (I like to support local craft shops too. Use them or lose them, I say!). Link to the particular stuff I used here: http://www.hobbycraft.co.uk/decoart-americana-chalkboard-paint-59-ml/563790-1001 

I then halved a piece of chalk and stuck a small bit of paper round it to pretty it up. I stuck 
on the large flower with a sticky dot as it came on one and the two smaller ones I used 
tacky glue on. It's fairly sturdy so they won't fall off! I never got a photo of the ribbon I used
 but it's beautiful candy-striped chevron stuff I got free with Mollie Makes. gorge!

(The heart behind it I used washi tape on to create the stripes then painted various shades 
of coral and grey and added the wee acrylic flowers.)


Friday, 28 June 2013

Yee-ha!

Finally! I can finally post these pics! This is the make-up roll that I was making for my sister. It only took me a couple of hours one Sunday and I finished off the closing stitches during the week. I wanted to wait until I posted it to her so she wouldn't see the secret bits I added!

The pattern was from an edition of Craft Seller from a couple of summers ago. I simplified it as it was made from almost patchwork style bits and I wanted a solid  print. 

Quite simply,

- cut two pieces of fabric to 21 x 30 cm. these will be the outside and inside of the roll.

- cut another piece of fabric to 16 x 30 cm. this will be the pocket.

- iron interfacing to the back of all three pieces of fabric. This gives your work structure and stiffness. You might prefer a looser roll so feel free to skip the interfacing on the two larger pieces BUT do still interface the pocket fabric as it will make it more hard-wearing and professional looking.

- take the pocket material and fold over half a centimetre and the top long edge, then fold it over again. Iron the fold to smooth it down the run a quick straight stitch along it on the sewing machine.

- Put the pocket material wrong side down on the right side of the inner fabric piece, pin together and sew vertical lines starting at 1 inch from the left. Carry on sewing along 1 inch intervals to create the brush pockets. You will have a wider gap for the last pocket but this was intentional as my sis wanted to make sure she could fit her big blusher brush in!

- Pin the outer piece and the now-joined inner piece and pocket right sides together, pin and sew a straight stitch seam about 1 cm from the edge. Remember to leave a gap to turn right side out.

I added a ribbon in before I machine-stitched the piece. I simply got a length of ribbon - up to you what length - and pinned it into the seam with the ribbon being tucked out of the way inside.

- iron, turn out using a chopstick if needed to push corners out neatly. Before I turned mine out, I chopped the corners off diagonally to try and get sharper corners.

- add button or any other embellishments, hand-stitch opening closed, roll et voila! :)

Sis had picked the fabric from my stash. It's Cath Kidston Cowboy fabric and it's quite thick. She then chose red polkadot for the pockets and I added the handmade fabric button and swallow ribbon. The ribbon was free with Cloth magazine and you might remember I added it to a hat I bought a few weeks ago. And to the photos...


Tuesday, 25 June 2013

Wash Tape Fun!

I had a craft extravaganza this weekend. A craft-travaganza, if you will. :) I had been pinning and liking lots of things on Pinterest and decided to stop pinning and get crafting! I tried my hand at stripe colour-blocking and thought I'd decorate a thick cardboard cd box I got from Hobbycraft a while back. It was on sale and has a cute chalkboard paint bit at the front. CDs?! Pah... Sewing stash, more like! 

I used some washi tape to create areas I didn't want the paint on and quickly covered the lid in coral-coloured acrylic paint like so:


Then came the fun peeling bit... 


It's a bit like a Pinterest post I saw about making wall canvases from old shoebox lids but I resisted the temptation to stick it on the wall!

I added some measuring tape patterned washi tape round the edge of the box like so:


And here's the finished box, complete with handmade-by-me resin chrysanthemum glued on the front. What do you think?!


Monday, 17 June 2013

Vintage-esque Photo Fun!


I love the app 'old photo pro'. There, I said it. I don't work for them or anything but it's just a cool app for when you want a straightforward vintage filter with no messing. I've vintaged up quite a few photos with it but wanted to share these two...


It's the top corner of our small bookcase in the living room. There's a cute key print square plate I got on eBay and a gorgeous Ashleigh and Burwood fragrance lamp we got as a wedding gift. Behind is the birthday card I got hubby and an empty frame I have yet to fill. Card from an independent art shop in Edinburgh - Edinburgh Art Shop, funnily enough! 

The photo below is my craft book shelf. I devour craft instructions and ideas and inspirations so always assumed I had loads of craft books but I actually don't! When we rejigged the living room and I put in this bookcase, I thought they would fill it but no! Has given me the excuse to buy more, though! Now... To find a place for all my magazines! 


Roll up!

My lovely sister was over at the weekend. I love my Saturdays with my big sis! We made tapas and other snacks for lunch - chorizo in red wine, red pepper Spanish omelette, lemon houmous and breads, since you ask. Sis brought homemade sunflower bread and it was YUM! :)

She also helped me to sort out my craft brain (see previous post re too much inspiration and not enough focus) so I am thanking her by custom-making a make-up brush roll for her holidays. Sis picked the materials from my stash -Cath Kidston cowboy print and some red and white polkadot - and I started working on it the next day. 

It's a pattern I tweaked from an old edition of 'Craft Seller' magazine and basically you need to cut two pieces of fabric measuring 21 x 30 cm and one piece of 16 x 30 cm (for the inside brush pocket).


It's actually almost done with just the final slipstitches needed to close it. I'll post more when it's done but here's a sneak preview of the button I made from the cowboy fabric and one of those self-cover buttons. 


Can I get a big YEEEEEEEHA!!!! xx